
Raspberry Pi Arch Linux ARM Tutorial

The Raspberry Pi created quite the buzz on the internet prior to its release. Much like the rest of the electronics community, we here at SparkFun couldn’t wait to get our hands on one. Although we don’t have the Raspberry Pi in our catalog at this time, we do think it is an awesome tool for those looking to take their projects to the next level by mixing the worlds of Linux and embedded electronics. To help make that happen, we have written this tutorial to assist those who might be new to the Raspberry Pi, and are considering the dive into the Arch Linux ARM distribution.
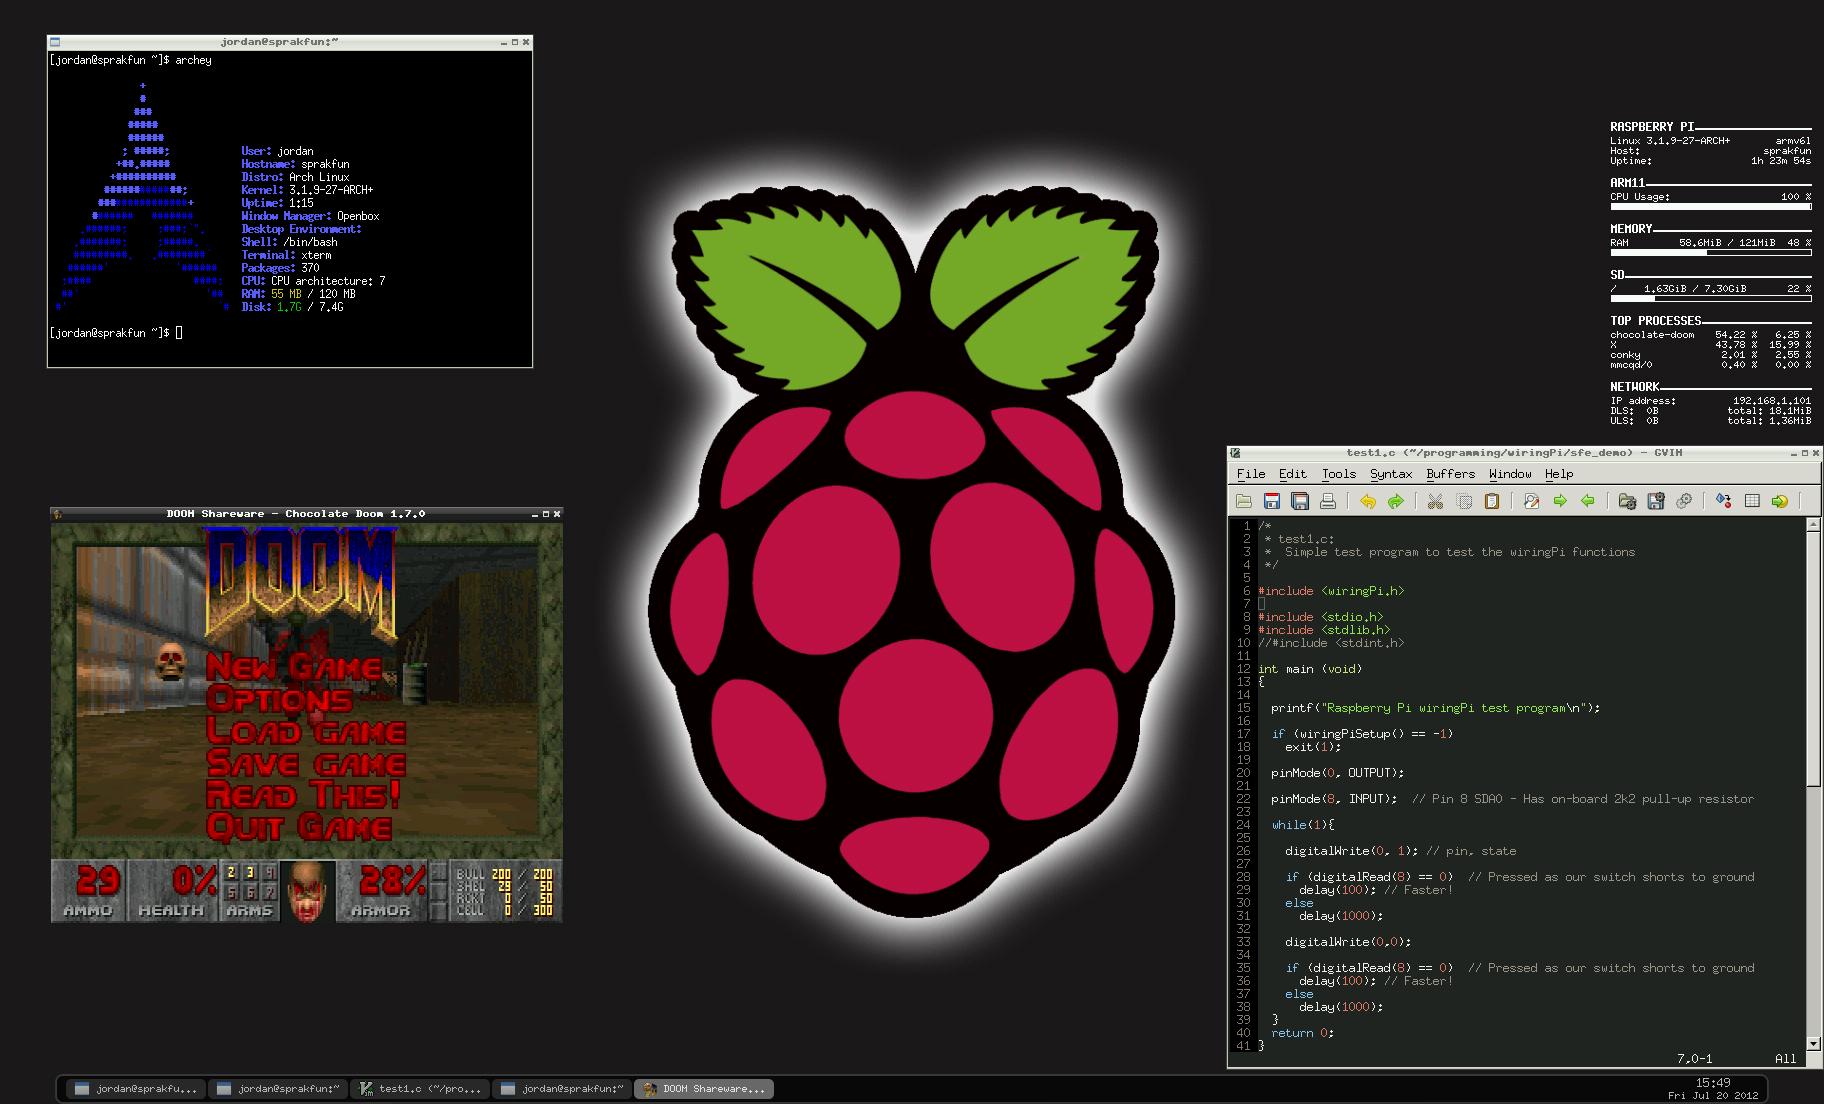
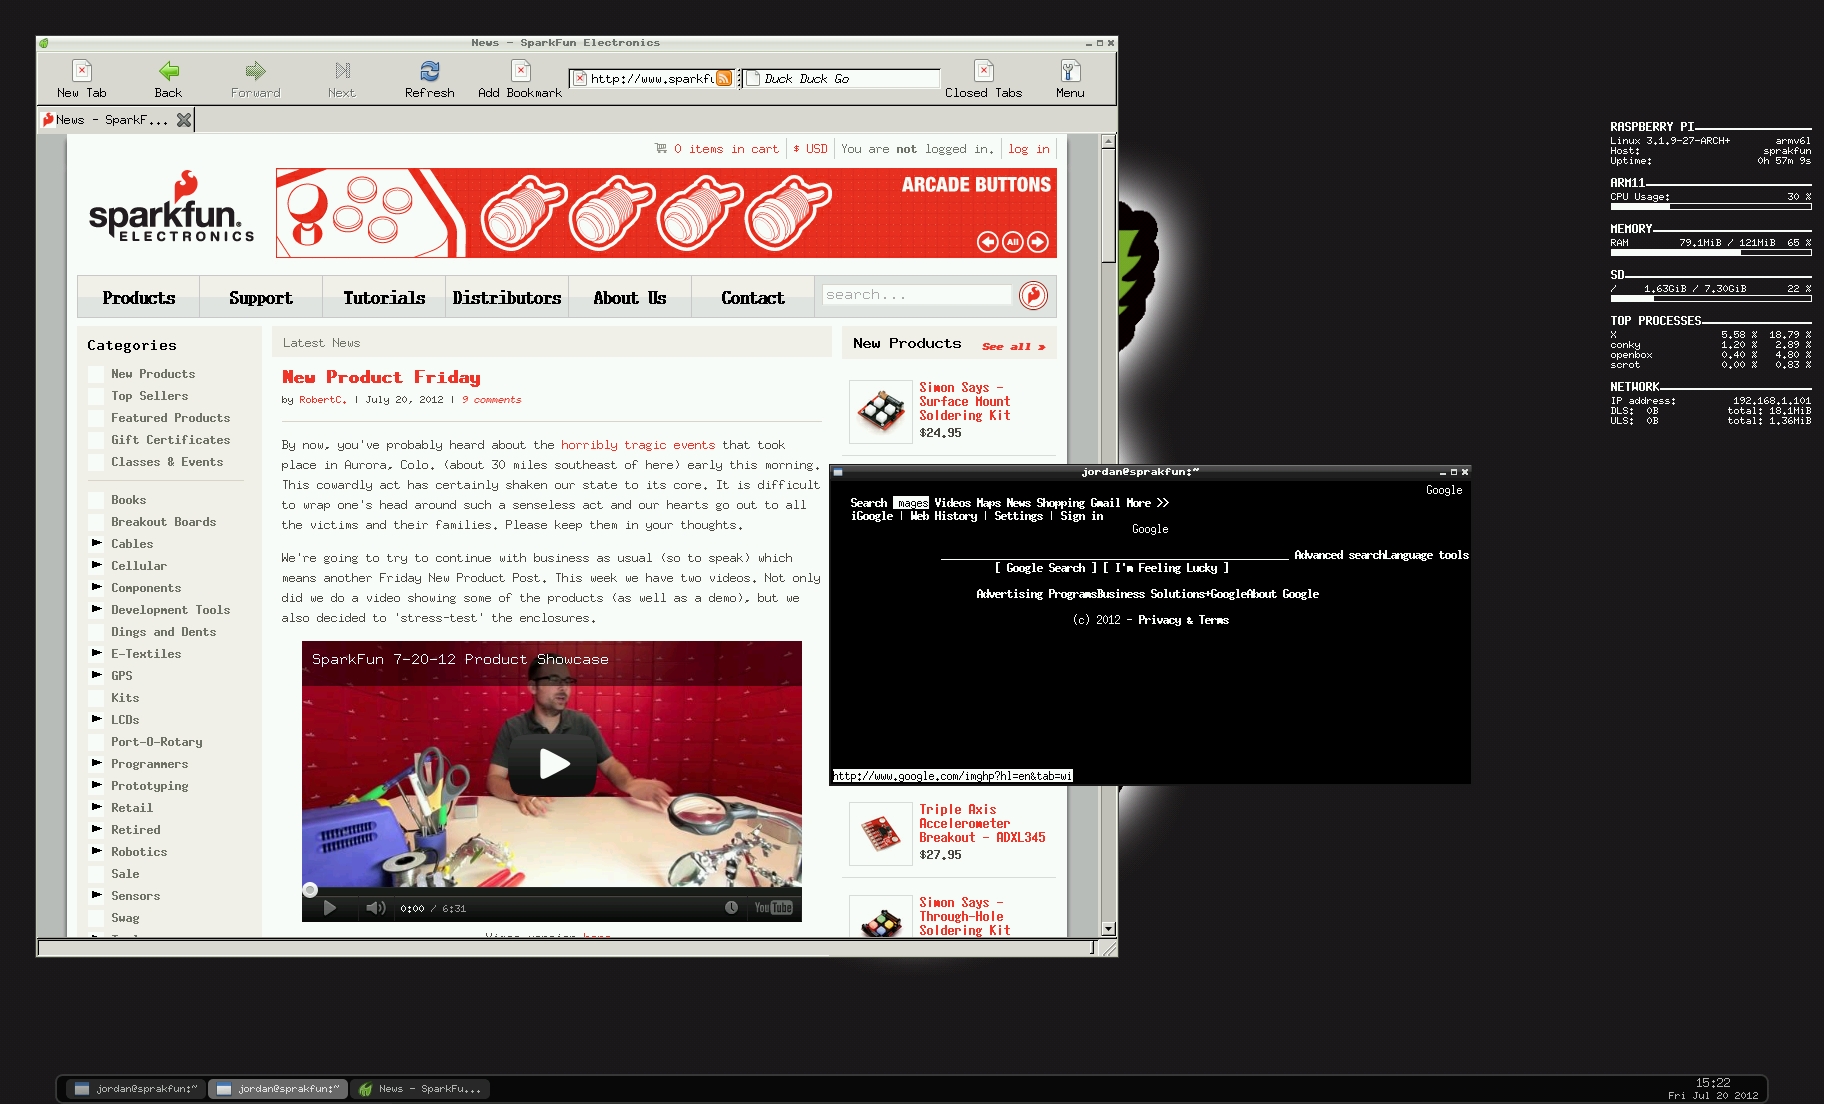
The End Goal – A Raspberry Pi Desktop Ready for Work or Play
Contents:
[01] Introduction: What is the Raspberry Pi?
[02] Who is this tutorial for? Why Arch Linux ARM?
[03] Hardware to get started
[04] Install Arch Linux ARM on a SD Card
[05] Optional: Resize SD card, for those with SD cards > 2 Gigabytes
[06] System Configuration – Change root password, timezone, hostname
[07] Full system update using the package manager, pacman
[08] Install sudo and add your first user account
[09] Install Sound/Video Drivers (Alsa, Xorg)
[10] Install the window manager Openbox and terminal Xterm
[11] Configure Openbox, themes/settings, right click menu
[12] Desktop background with Feh
[13] Taskbar with Tint2, Optional: System Performance with Conky
[14] Install internet browsers, Midori (graphical) and Links (text only)
[15] Install a file manager, Thunar, and a 3D demo for testing
[16] Install a programming environment and tools for C, make and Python
[17] WiringPi library and GPIO access, for GPIO with C or command line
[18] Optional: Install a package from the AUR the hard way: Packer
[19] Install DOOM
[20] General References
[01] Introduction: What is the Raspberry Pi?
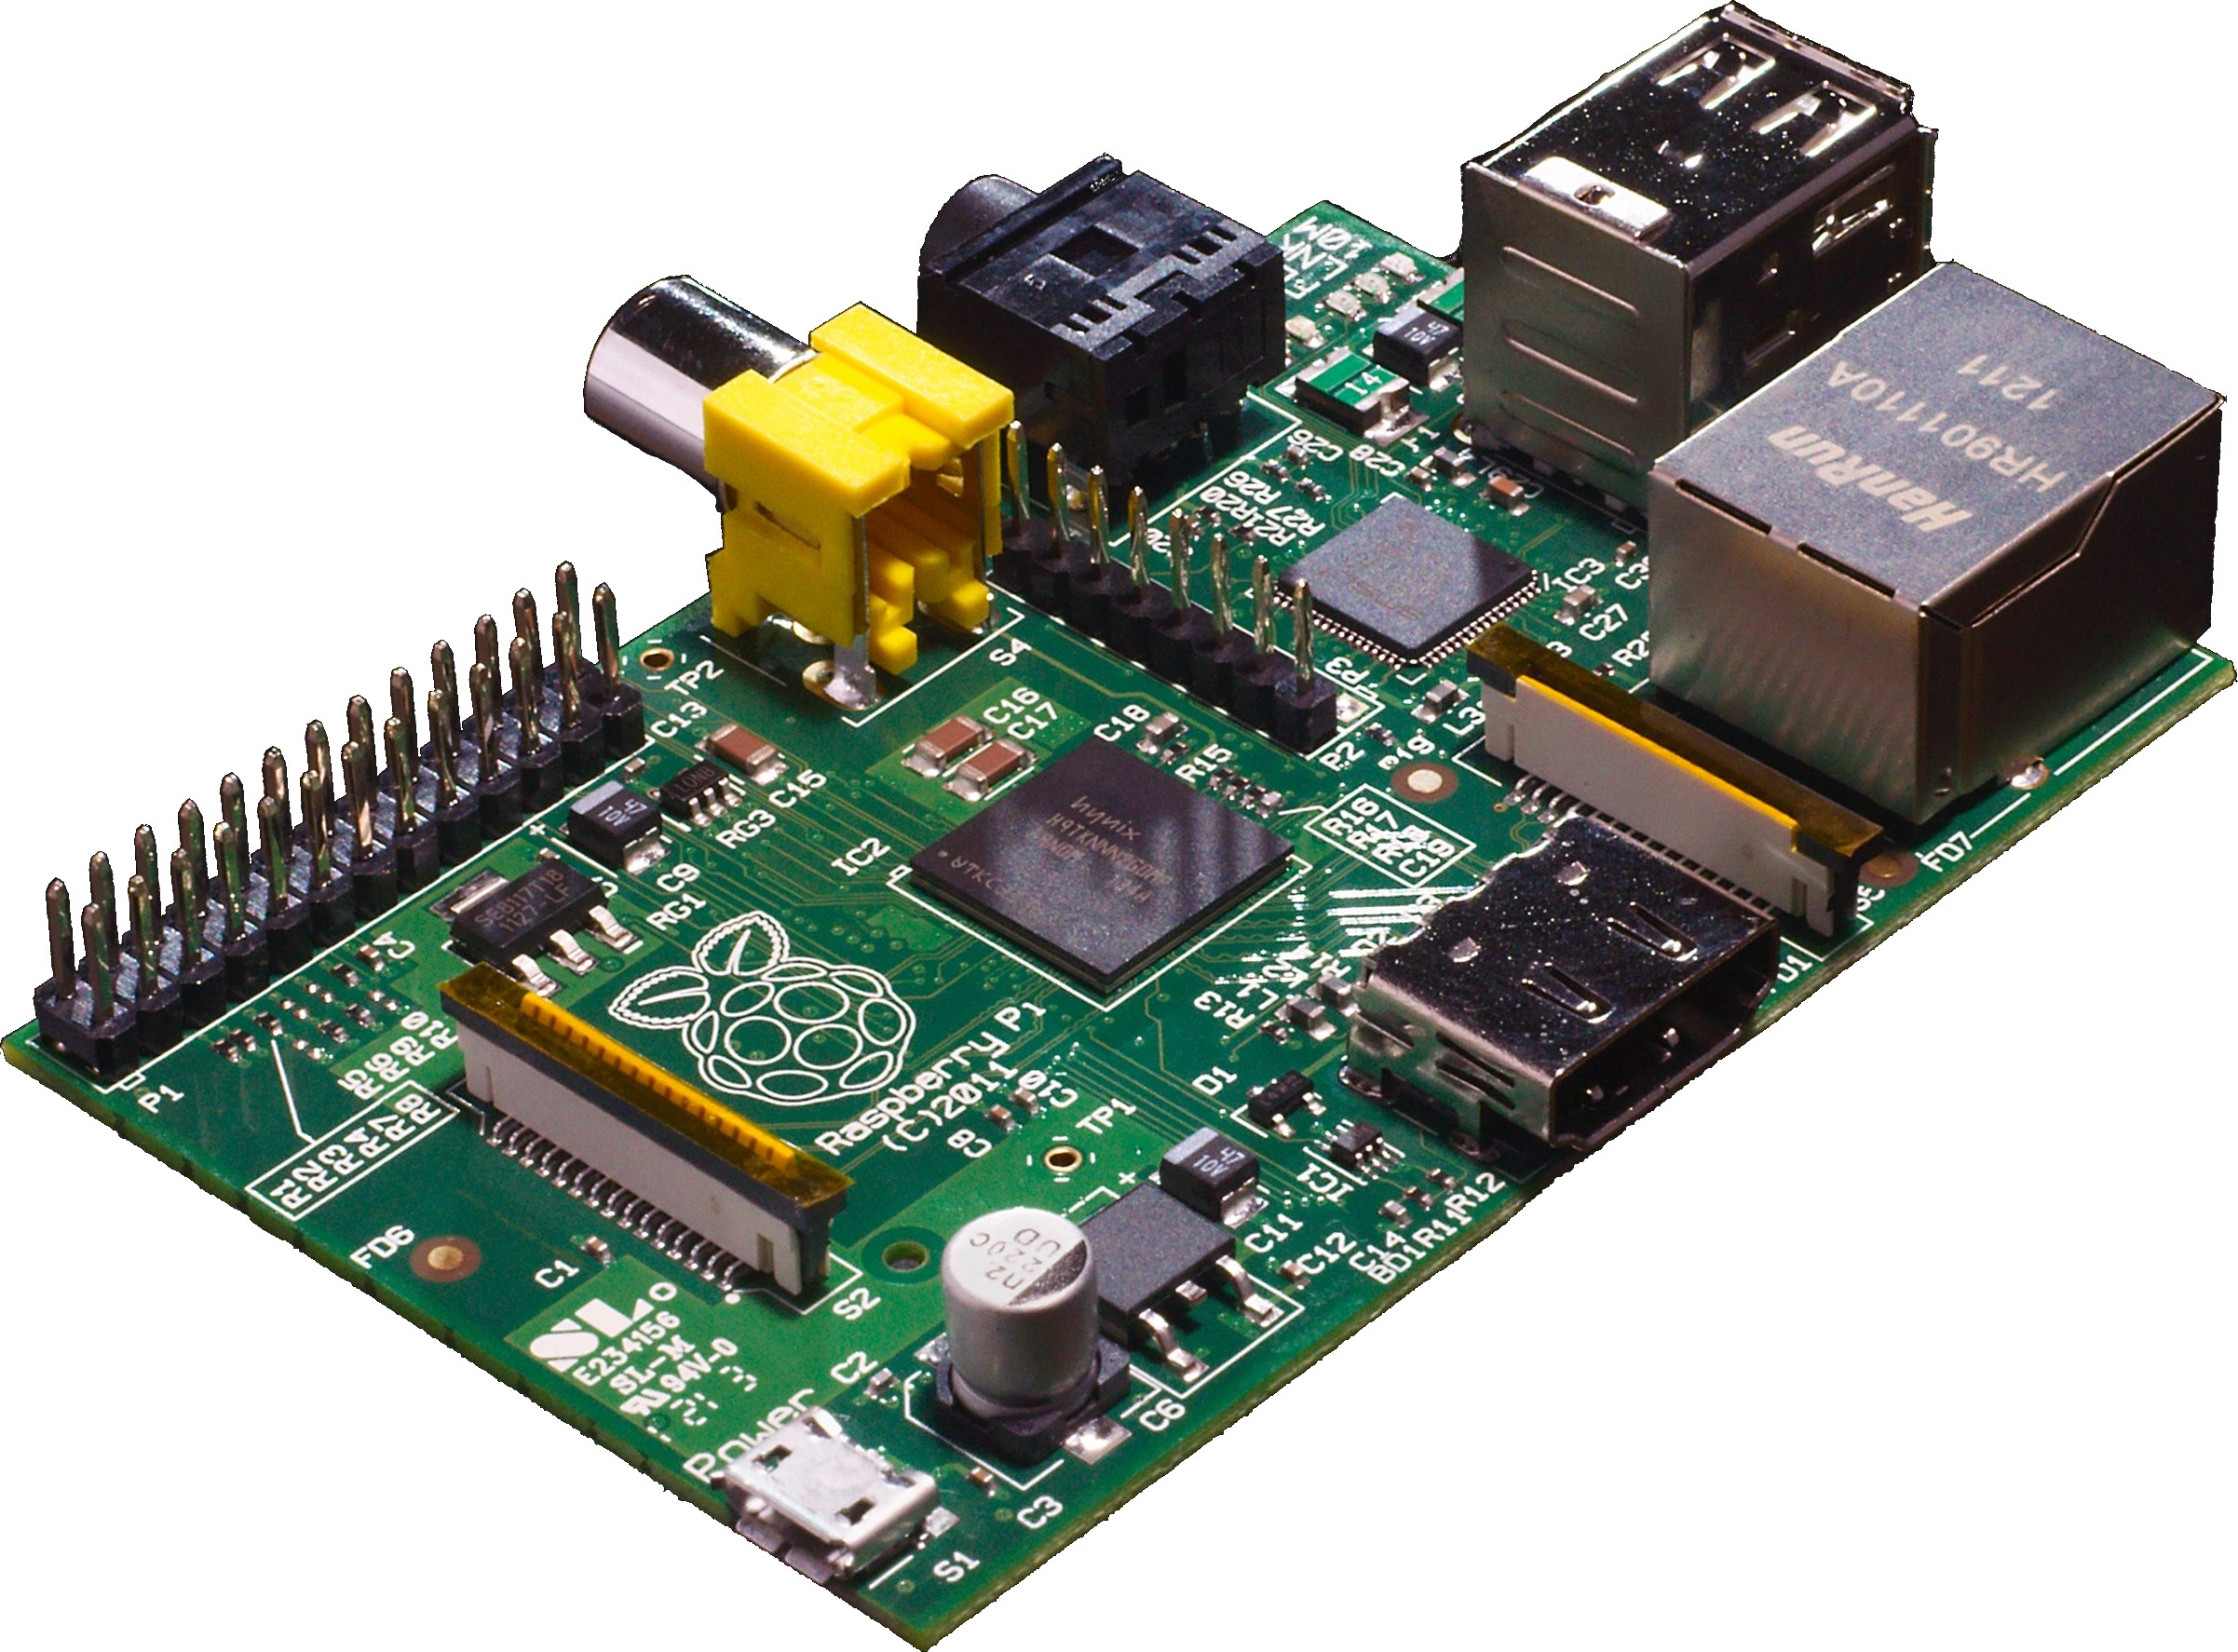
The Raspberry Pi is a cross between a typical embedded system, like an Arduino, and a desktop computer. The Pi definitely packs some power considering the Pi sports a 700MHz ARM 11 Core with 256MB’s of RAM and up to a 32GB SD card for storage. In the eyes of some, it’s one of the more powerful embedded boards to hit the market. To others, it’s one of the most compact, bare-bones personal computers ever to grace the electronics world with it’s presence. In either case, it’s here to blur the line between the world of embedded electronics and personal computing.
The Raspberry Pi is a great platform on which to learn Linux and programming because, at any time, you can backup your SD card essentially creating an image of your work. Thus, if something goes wrong, you can just reload your old image and start over. One great use of the Pi could be as a home server to control and do processing for other hardware, including other development boards, if you wanted.
For more information, visit the official FAQs.
[02] Who is this tutorial for? Why Arch Linux ARM?
This tutorial is for those who want to put a barebones OS on their Raspberry Pi, which starts with just a command line and a few basic Linux utilities, and who want to learn how to customize it to their desire.
We begin with the basics showing you what hardware you need to get started and how to get a Linux image onto your SD card. By the end of the tutorial, you will have learned how to configure your system, install/update programs, learn how to install a desktop environment so you can use GUI applications including the internet and DOOM, and set up a full programming environment so you can create your own programs and control the Pi’s hardware inputs and outputs, or GPIO.
Why Arch Linux ARM? For 3 reasons:
- Arch Linux ARM is bare-bones, great for when you need all the power you can get out of an older computer, or an embedded system like the Raspberry Pi. You install only what you want to install.
- Arch Linux ARM follows the philosophy of K.I.S.S. : Keep It Simple Stupid. It does it’s best to keep technical things simple, and it is great for people who like to understand how complex things work.
- To provide an alternative to Debian. I’ve used Arch before and like it even though there is a bit of a steep learning curve at first (if you’re new to the Linux command line).
Warning for the beginners out there:
If you are new to Linux, you will be able to complete the tutorial if you follow the instructions, although you might have to do a some Googling if you run into a random problem not covered and need to troubleshoot. You might consider starting with the Debian image instead as it has a desktop environment pre-installed, but you’ll learn a lot more this way. At the very least, I recommend familiarizing yourself with some basic Linux commands before you start (like ls, cd, man, cp, pwd, mkdir, reboot, rm, shutdown…) or look them up as you go along.
[03] Hardware to get started
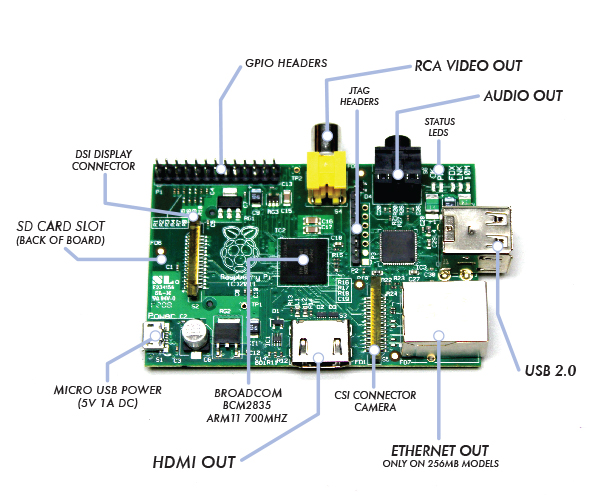
A look at the hardware and connections of the Pi
You’ll need the following hardware to use your Raspberry Pi:
- 2GB+ SD card
- SD card reader
- USB keyboard – Current rating of < 140 mA (get repeating keys and weird issues if not)
- USB mouse – Current rating of < 140mA
- Display (with HDMI, DVI, Composite, or SCART input) and appropriate cable
- USB wall charger / micro USB cable – Current rating > 700mA at 5V
- Audio cable if HDMI display doesn’t have speakers, or you’re not using HDMI
- Ethernet cable
Some SD cards won’t work. To be sure you buy a working one, check this list of verified working SD cards first.
[04] Install Arch Linux ARM on a SD Card
Download the Arch Linux ARM image found here.
Write the Arch Linux ARM image to SD card:
For Windows:
- Download the SD image writer tool.
- Unzip and run the image writer tool.
- Plug SD card into an SD card reader and put that in your computer.
- Burn the Arch Linux ARM image file (.img) found above to your SD card.
For Linux/Mac:
- Follow the directions on this page.
Put the SD card into the Raspberry Pi.
Connect your display, keyboard, mouse, ethernet cables to the Pi.
Lastly, connect power through the micro USB cable.
The Pi should boot up Arch Linux ARM and get to the log-in screen.
Log in with:
user / password: root / root
Troubleshooting note:
On initial boot, if nothing shows on the screen. Try fixing it by putting the SD card back into Windows and deleting the config.txt file on the SD card. Apparently the config file sets the hdmi mode…
[05] Optional: Resize SD card, for those with SD cards > 2 Gigabytes
For reference, login as root on your Pi and check current card format settings with:
# df -h
For Windows/Mac:
- Download the Gparted Live CD.
- Burn the Gparted ISO to a blank CD.
- Make your computer can boot from CD before its hard drive. You might have to change your BIOS boot settings.
- Place the Gparted CD into your computer and reboot.
- Once the Gparted CD has booted, load the program Gparted (should be automatic but there’s an icon if not).
For Linux:
- Install Gparted with your package manager.
- Start the program Gparted.
Now to actually resize the SD image with Gparted:
Plug the SD card into your SD card reader and plug that into your computer.
In the Gparted program, make sure the right drive (the SD card) is selected.
You should see two partitions.
Extend the second partition (ext4) on the SD card to the full size of the card and click apply.
You’re done. Close Gparted.
If you’re on Windows or Mac, you can revert your BIOS settings and reboot back into your operating system now.
Put the SD card back into Raspberry Pi.
For reference, login as root and recheck card format settings to verify success:
# df -h
[06] System Configuration – Change root password, timezone, hostname
Login as root.
Change root password:
# passwd
Change local timezone:
Find your zone:
# ls /usr/share/zoneinfo
# ls /usr/share/zoneinfo/America
Default is Europe/London, SFE timezone is America/Denver
Modify file /etc/rc.conf, under LOCALIZATION, change TIMEZONE=”Europe/London” to your zone
Use nano or vi to actually edit the file:
# nano /etc/rc.conf
Change the Pi’s hostname:
Modify /etc/rc.conf
Under NETWORKING, change HOSTNAME=“alarmpi” to “desired_pi_name”
# nano /etc/rc.conf
Modify /etc/hosts, look for the line 127.0.0.1 localhost.localdomain localhost
# nano /etc/hosts
Change the line by adding your desired host name to the end like so:
127.0.0.1 localhost.localdomain localhost desired_pi_name
[07] Full system update using the package manager, pacman
Login as root.
Update System:
# pacman -Syyu
If it asks to update pacman:
choose ‘No’
If it asks you to replace any packages:
choose ‘Yes’ to each one
Pacman will now go through and check for conflicts.
If anything conflicts, don’t force the package.
Instead, read up on the package that’s causing the conflict either on the Arch Linux ARM forums, IRC (channel #archlinuxarm on irc.freenode.net), or see if there is any news about it on upstream Arch. This is a good example of news about a previous conflict.
If all goes well, run this to verify updating has completed successfully:
# pacman -Syu
… Should report nothing to do.
[08] Install sudo and add your first user account
Install sudo:
# pacman -S sudo
… Allows users with permission to perform root functions with sudo.
Change sudo permissions:
For nano users:
# EDITOR=nano visudo
OR for vi users:
# visudo
Uncomment (take away the #) the line that says: %wheel ALL=(ALL) ALL
OR the line that says: %wheel ALL=(ALL) ALL NOPASSWD: ALL
… if you don’t want to type in your password every time you use sudo
Add user, normal non-root login:
# adduser
Give desired login name and password.
Use defaults for user id, initial group (just hit enter)
For additional groups, add the following:
audio,lp,optical,storage,video,wheel,games,power,scanner
Use defaults for home directory, shell, expiration date, name, phone etc…
Reboot Pi and login as your new user:
# reboot
Log back in with the user/pass you just created.
Side note:
If you ever forget to use sudo before a command that was supposed to have it, and after trying to run the command, it reports you don’t have the privileges to run the command. Then run the command known as “sudo bang bang.” There is no need to run this command now though, this is purely so you know in the future:
$ sudo !!
This reruns the previous command you typed now with sudo in front of it so it will now run again, but this time with root privileges. This will be handy to know sooner or later. I often forget to type sudo myself.
[09] Install Sound/Video Drivers (Alsa, Xorg)
Login as newly created user.
Install Alsa, Advanced Linux Sound Architecture, required for sound:
$ sudo pacman -S alsa-firmware alsa-utils alsa-oss
Install Xorg, pre-requisite for GUI apps:
$ sudo pacman -S xorg-server xorg-xinit xorg-utils xorg-server-utils
Install Xorg video driver:
$ sudo pacman -S xf86-video-fbdev
[10] Install the window manager Openbox and terminal Xterm
Install Openbox & config utilities
$ sudo pacman -S openbox obconf obmenu lxappearance consolekit
Make initial configuration files for your Openbox user:
$ mkdir -p ~/.config/openbox/
$ cp /etc/xdg/openbox/menu.xml ~/.config/openbox
$ cp /etc/xdg/openbox/rc.xml ~/.config/openbox
Create/Modify user’s /home/username/.xinitrc file
$ nano ~/.xinitrc
Add the following line to this file:
exec ck-launch-session dbus-launch openbox-session
Before starting Openbox for the first time, let’s install a terminal Xterm:
$ sudo pacman -S xterm
Check to see if Openbox works now:
$ startx
This launches Openbox thanks to changes in ~/.xinitrc.
Now you have an empty screen and should be able to right click to see a menu.
This menu list can be customized and currently lists a lot of programs that are not installed.
You can install any you want later on and modify the menu to make it more tailored for your use.
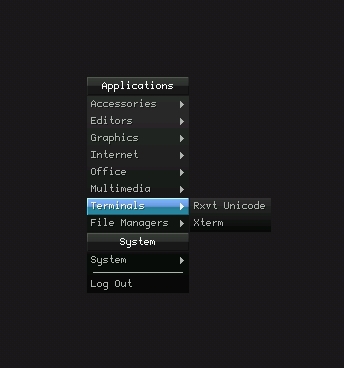
Right click on the desktop and use the menu to start Xterm: Terminals -> Xterm as seen above.
[11] Configure Openbox, themes/settings, right click menu
Run the following commands for these steps within Openbox using Xterm.
To set up themes and other Openbox settings:
$ obconf
To customize your right click menu:
$ obmenu

Logout of openbox:
Right click and select: Log Out
[12] Desktop background with Feh
Install desktop background:
$ sudo pacman -S feh
Make a directory for your background, then go to it:
$ mkdir ~/wallpapers
$ cd wallpapers
Find a wallpaper on the net then download with wget:
$ wget http://dlnmh9ip6v2uc.cloudfront.net/tutorialimages/RaspberryPi/pi_wallpaper.jpg
Set your wallpaper (make sure to change destination to actual username and filename):
$ feh –bg-scale /home/username/wallpapers/path_to_image.file
Modify /home/user/.fehbg to tell feh where your wallpaper lives for autoloading:
$ nano ~/.fehbg
Add line (make sure to change destination to actual username and filename):
feh –bg-scale ‘/home/username/wallpapers/path_to_image.file’
To make your desktop load when starting Openbox, modify file /home/user/.config/openbox/autostart :
$ nano ~/.config/openbox/autostart
Add line:
sh ~/.fehbg &
[13] Taskbar with Tint2, System Performance with Conky
Install tint2 for a taskbar:
$ sudo pacman -S tint2
To make your taskbar load when starting Openbox, modify /home/user/.config/openbox/autostart :
$ nano ~/.config/openbox/autostart
Add line:
tint2 &
Configure tint2 from within Openbox:
$ tint2conf
Click properties and use the menu that pops up (takes a second).
Optional: Install Conky for desktop performance tool:
$ pacman -S conky
To make your performance monitor loads when starting Openbox, modify /home/user/.config/openbox/autostart :
$ nano ~/.config/openbox/autostart
Add line:
conky &
For default configuration:
$ cp /etc/conky/conky.conf ~/.conkyrc
OR for other configs:
Grab a config you like from SourceForge.
OR grab my current one from here (make sure you’re in your home directory ~/ ):
$ wget http://dlnmh9ip6v2uc.cloudfront.net/downloads/tutorials/RaspberryPi/pi_conkyrc
$ cp pi_conkyrc ~/.conkyrc

[14] Install internet browsers, Midori (graphical) and Links (text only)
Install Midori and Links browsers:
$ sudo pacman -S midori links
Run Midori with command (from within Openbox):
$ midori
… Or add it to your Internet submenu for Openbox
Run links with command:
$ links http://www.google.com
Troubleshooting note:
Midori was sluggish at first.
Solution:
Back up the file start.elf. Copy arm192_start.elf and rename the copy to start.elf. Then reboot the Pi.
$ sudo cp /boot/start.elf /boot/start-backup.elf
$ sudo cp /boot/arm192_start.elf /boot/start.elf
$ sudo reboot
You will now have more memory for graphical applications (192MB) by borrowing some from the OS. Alternatively you can use arm128_start.elf if you plan on using heavy 3D, video or GUI applications and arm224_start.elf if you don’t really care about graphics at all.
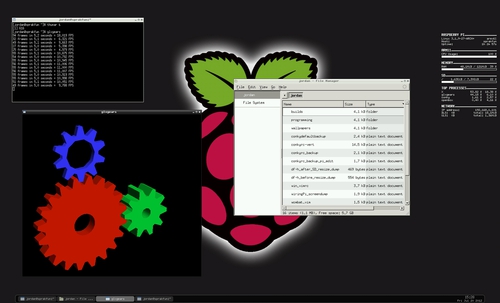
[15] Install a file manager, Thunar, and a 3D demo for testing
Install Thunar, for looking at files through a GUI:
$ sudo pacman -S thunar
Install mesa-demos for a quick demo of the Pi’s 3D capabilities:
$ sudo pacman -S mesa-demos
Run one of the demos (from within Openbox of course):
$ glxgears
[16] Install a programming environment and tools for C, make and Python
Install the base development package so you can compile C programs:
$ sudo pacman -S base-devel
This installs gcc and make plus other useful tools you may need for development.
More specifically, it installs the packages: autoconf, automake, binutils, bison, fakeroot, flex, gcc, libtool, m4, make, patch, pkg-config
Install Python 3 (python) or Python 2.7 (python2)
$ sudo pacman -S python python2
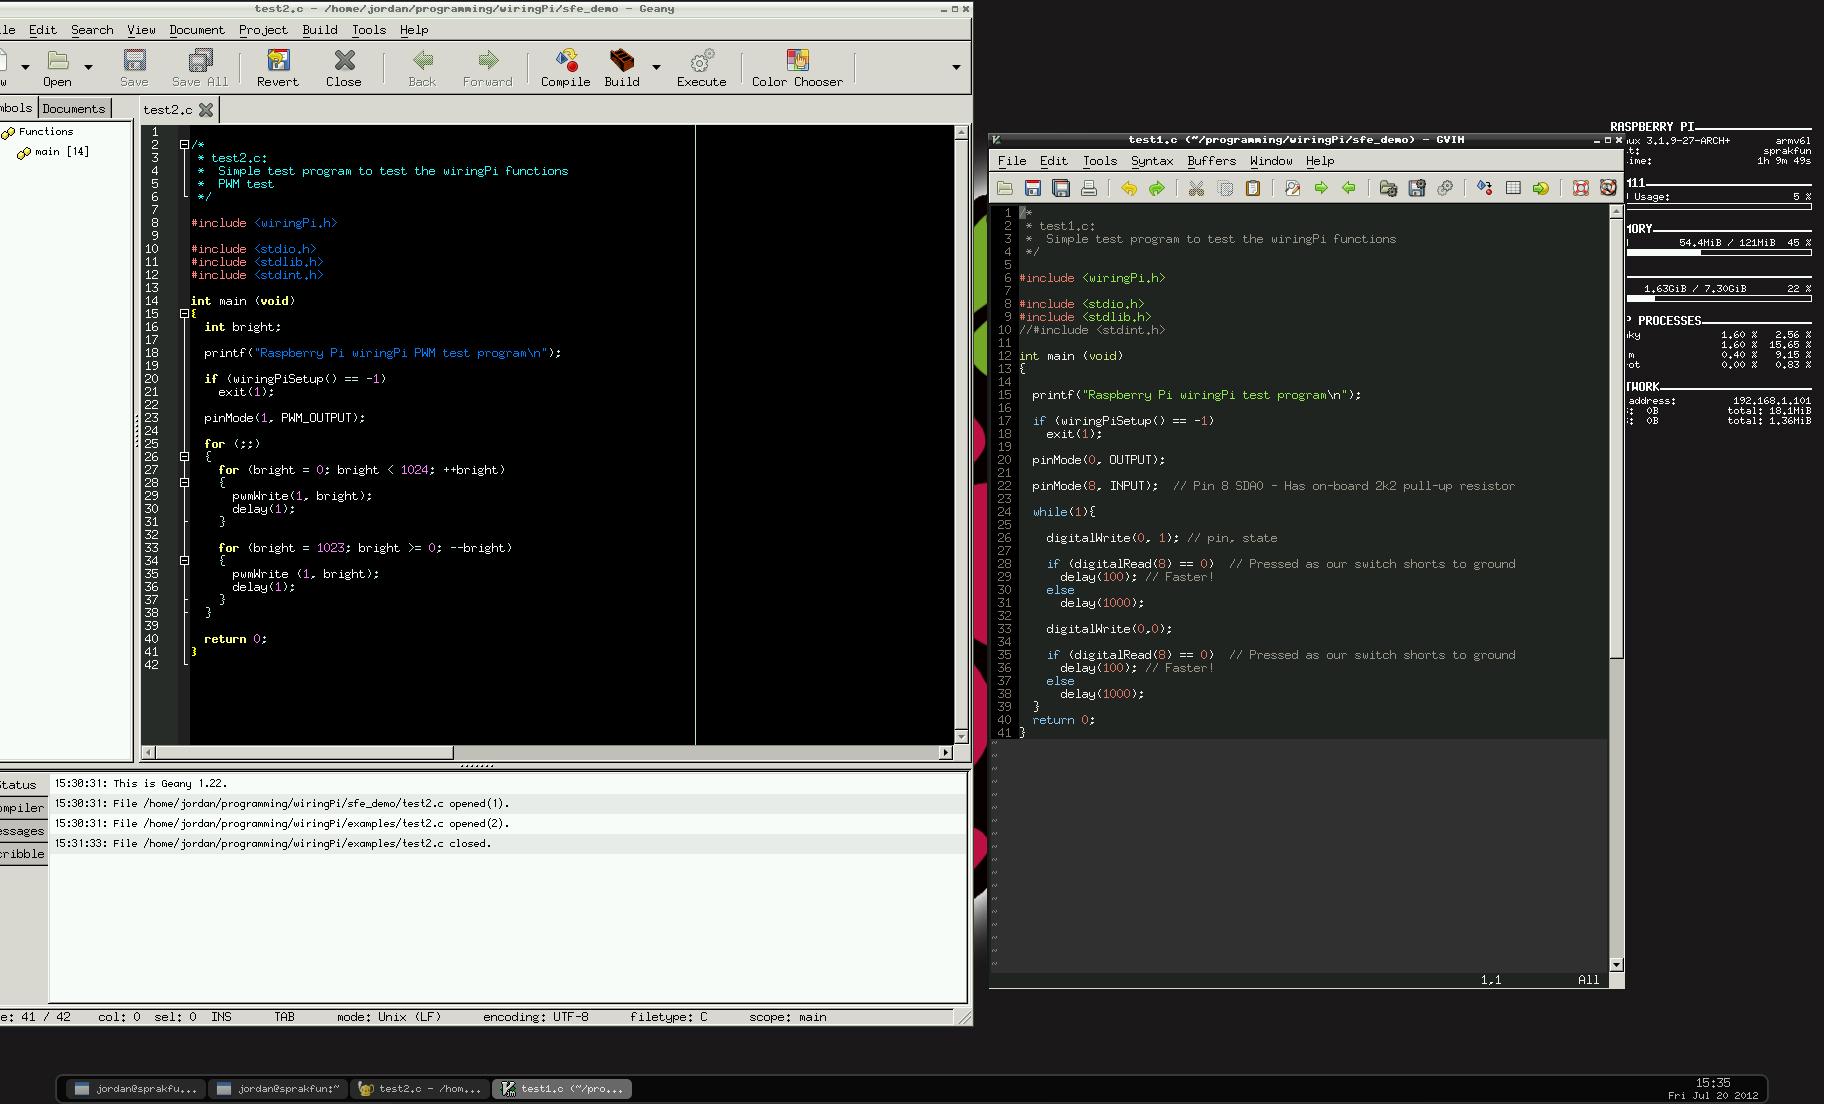
Install a programming text editor environment:
$ sudo pacman -S geany gvim emacs
Geany’s the most beginner friendly of these three. There’s also other options out there.
[17] WiringPi library and GPIO access, for GPIO with C or command line
Installing WiringPi:
$ pacman -Sy wiringpi
The y flag is just to make sure the package is the most current.
To Test the GPIO, you will first have to setup the electrical connections:
Wire up an LED and 330 ohm resistor between these two pins:
GND Pin: Physical pin 6
WiringPi Pin 0: Physical pin 11
These pins are a part of the large 26 pin connector between the yellow RCA input and the SD card. Physical pin 1 is marked with P1. All the odd pins are on one side of the connector and the even on the other counted in order. For more explanation, visit theWiring Pi site or the Elinux wiki.
Test GPIO with Command line:
Set the pin to output mode, then turn the LED on and off:
$ gpio mode 0 out
$ gpio write 0 1
$ gpio write 0 0
Test GPIO with a C program:
Go to the WiringPi source code directory, then make/run test1 to see if the LED blinks
$ cd /usr/share/wiringpi/examples/source_code
$ sudo make test1
$ sudo ./test1
To stop the program, press ctrl+c.
Feel free to edit the code in test1.c with your text editor of choice, recompile and rerun.
$ geany test1.c
You can use the command make all to compile the rest of the WiringPi example programs and feel free to look at their source as well. It all looks very similar to standard Arduino code.
[18] Optional: Install a package from the AUR the hard way: Packer
Packer allows for easy installation of programs that exist in the AUR, the universal repository. First, we have to install at least one package from the AUR the hard way, Packer. You’ll want this program if you want to install other packages that are not officially supported by the developers of Arch Linux ARM the easy way, as opposed to doing what we’re about to do, installing a package from the AUR the hard way.
Make build directory for making AUR programs, in this case packer:
$ mkdir ~/builds
$ cd ~/builds
Get packer tar file and extract (I found this by searching the AUR):
$ wget http://aur.archlinux.org/packages/pa/packer/packer.tar.gz
$ tar -zxvf packer.tar.gz
Install packer:
$ cd packer
$ makepkg -s
How to use packer (hint, just like pacman):
Find a package on the AUR you want, then:
$ packer -S name_of_desired_AUR_package
[19] Install DOOM
Install chocolate-doom:
Chocolate-doom is a shareware port for running DOOM game files (.wad files).
$ sudo pacman -Sy chocolate-doom
Get shareware wad file for playing DOOM demo (you can also use your full game .wad files if you own the game):
$ cd /usr/share/doom
$ sudo wget http://www.jbserver.com/downloads/games/doom/misc/shareware/doom1.wad.zip
Unzip the file, but first install the zip/unzip utilities:
$ sudo pacman -S zip unzip
$ sudo unzip doom1.wad.zip
Run DOOM!!!!
$ chocolate-doom -iwad /usr/share/doom/DOOM1.WAD -window
Forget the -window if you want full screen but it will run slower. The smaller the window, the less math the GPU has to do. Speaking of which, you can dedicate more memory to the GPU so it runs smoother by following the troubleshooting note after installing Midori. This allows for Midori and other graphics intensive applications like Doom run better by allocating a larger chunk of RAM for the GPU to use.
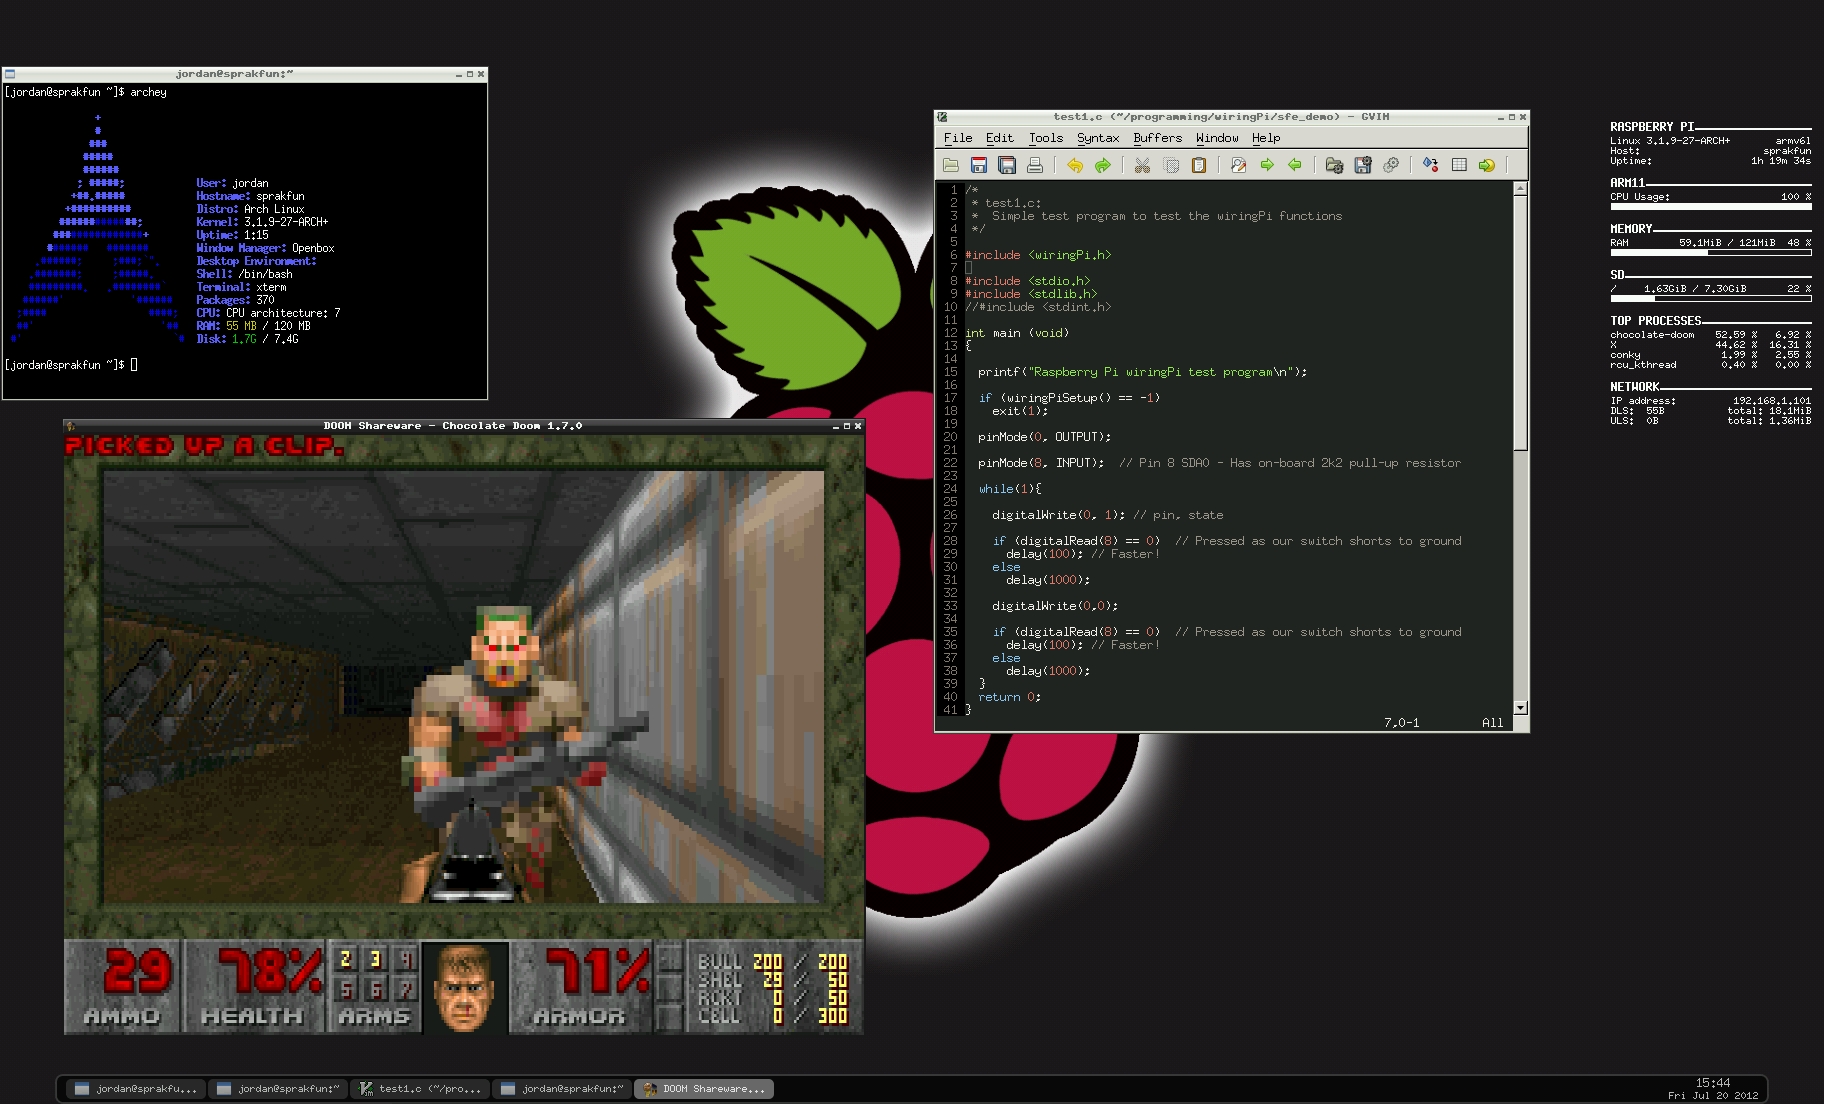
The End Result, the Fruits of Labor
DOOM Troubleshooting notes:
Sound may not work due to alpha drivers.
Solution:
Logout of Openbox, before typing startx:
$ sudo modprobe snd_bcm2835
Test playing sound file:
$ sudo aplay /usr/share/sounds/alsa/Front_Center.wav
If this works, start Openbox with startx and try running DOOM again.
If you still hear nothing, try this:
$ sudo amixer cset numid=3 X
… where X is 0, 1 or 2: 0=auto, 1=headphones, 2=hdmi
The auto setting defaults to hdmi if hdmi supports audio, and otherwise tries to use the analog/headphone jack.
Restart Openbox and Rerun DOOM.
[20] General References
Well, we here at SparkFun hope you have enjoyed the tutorial. By now, you’re surely ready for the longer journey of exploring the world of Raspberry Pi and Linux. Consider visiting some of the following references, and enjoy!
Elinux Raspberry Pi Hub
Elinux Troubleshooting Guide
Basic Linux Commands
Instructional video for Resizing the SD card
More Instructional Raspberry Pi Videos
Arch Linux ARM Forum
Arch Linux ARM IRC
Arch AUR Wiki
Chocolate Doom Wiki
Wiring Pi Library
VIM tutorial (for those learning VI / VIM / GVIM)
Source:
https://www.sparkfun.com/tutorials/372
RSS Links

Blogs I Follow
Top Posts & Pages
Image

RSS

Embedded System
 Học Để Làm
 RoMeLa
 Học AVR
IC Design & Manufacturing
 siliconrun
Scholarship Infomation
Nano Technology
 Nano Hub Project
 Nano Hub University
Global University
.jpg) Open Uni
Open Uni Uni of Oxford
 FPGA
FPGA
- An error has occurred; the feed is probably down. Try again later.
